Night Feedings

Dec. 4th, 2025 11:37 am
[syndicated profile] antiquelilac_feed
Many noble women in Medieval times chose to use a wet nurse, but Naomi didn't like the idea and wanted to try and feed her twins herself. 
She kept their cradle close beside her bed so it would be easier to just pick one up when they were hungry in the night...
...and take them into her bed with her.....
But as soon as one was finished, the other would wake up....
..so she wasn't getting much sleep...

Going Hunting

Dec. 3rd, 2025 11:37 am
[syndicated profile] antiquelilac_feed
I was working on book three in the Somewhere In Time series, while thinking ahead to book four, which will be all about the first year after the birth of Baron and Naomi's twins. Well, my sister and I were talking, and she asked what Baron does all day. Isn't he supposed to be a 'knight'? So I thought I needed to revisit those early days after the birth of the babies, to cover the nitty gritty of life with newborns in Medieval times, as well as Baron's training to regain his strength after the major injuries he sustained during the attack on the Winter Patrol the previous winter. I spent much of November taking the new photos....

As time passed, and Baron slowly recovered from his injuries the previous winter, he started to regain his strength and return to some of his favourite activities. Like going hunting with Rex.
It felt good to be back on his horse again....

Putting the Newborns in their Cradle

Dec. 2nd, 2025 12:21 pm
[syndicated profile] antiquelilac_feed
Another scene which needed additional new photos....

​After the birth of their twins, Baron got into the bed with Naomi and the babies ... and they lay there for a while just watching them
Until Baron finally got up and put the babies in their cradle....
... hoping they might all get a little sleep....
Then he tucked them in....
..and got back in the bed with Naomi, where they lay watching their new little miracles ... until they all drifted off to sleep....

Memories of the Early Days

Dec. 1st, 2025 12:07 pm
[syndicated profile] antiquelilac_feed
During the process of putting together the books featuring Baron and Naomi's story, it was sometimes necessary to photograph some extra scenes to fill in missing spots in the story. So, I'll start by sharing some of the brand new scenes which were needed for the third book in the series - Somewhere in Time, New Beginnings

Baron's Reaction

In book three - new Beginnings - it is revealed that Baron is actually Dominic's son, but Baron's reaction was never included in the original story.  
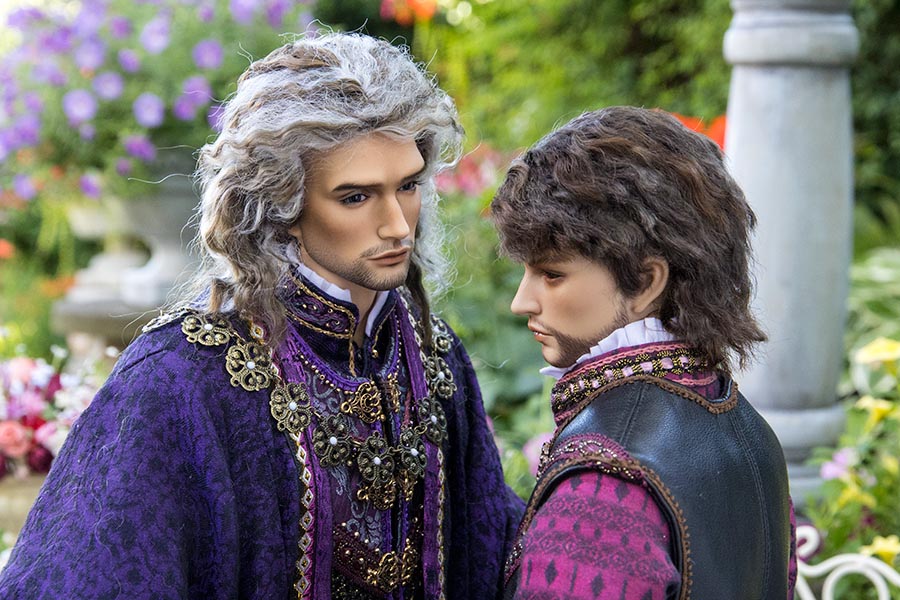
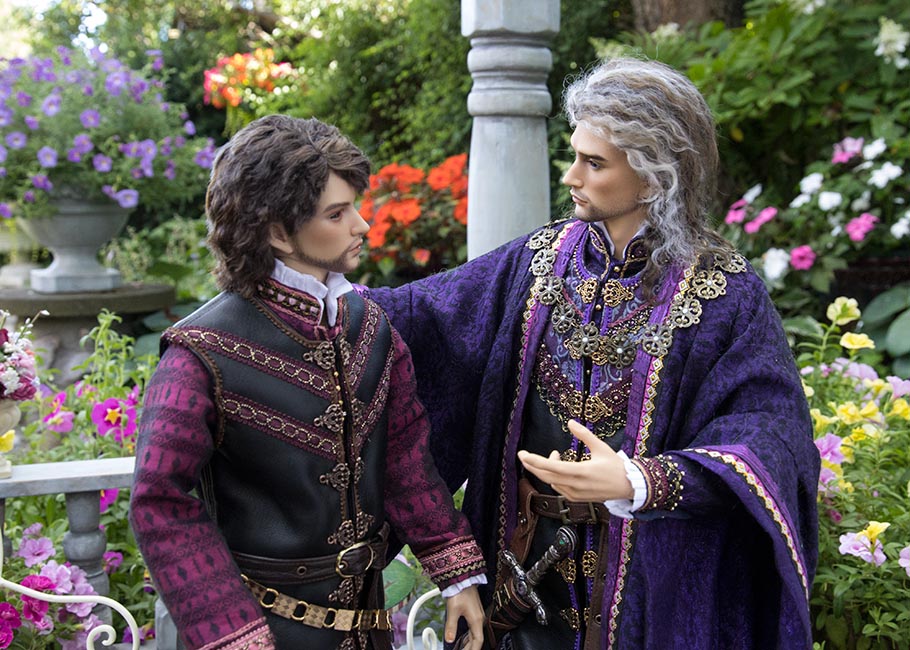
​After the revelation, Dominic and Baron went out to the terrace to talk....
We couldn't hear their conversation...
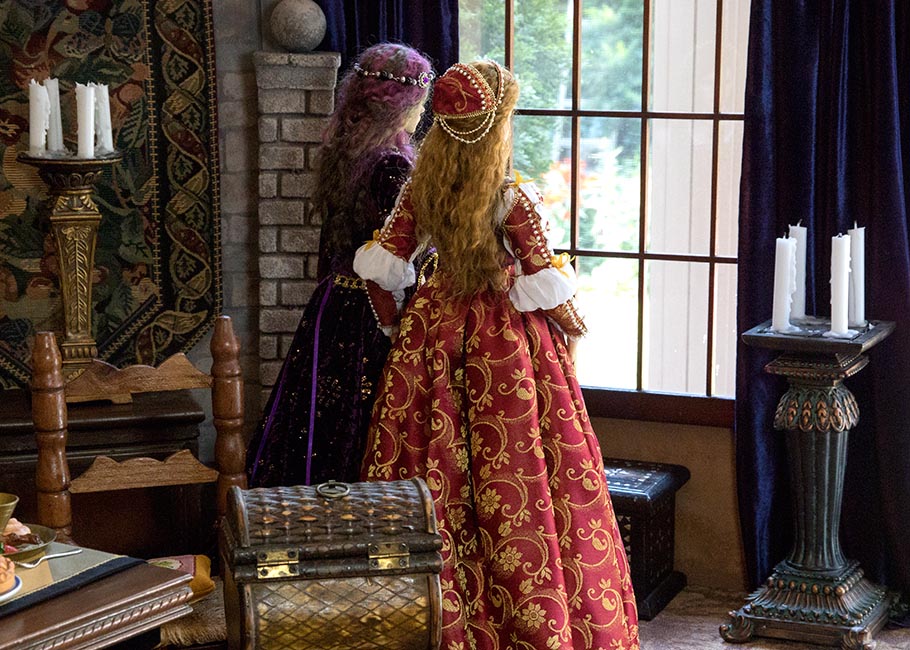
...and neither could Miho and Naomi, who were watching them through the window....
Baron was very quiet that evening back in their apartment. Naomi sensed that he was likely still in shock at the revelation.
“How are you feeling?” she asked.
“I’m okay.” he answered, “but it’s going to take a bit of time to get used to this. Dominic and I had a long talk in the garden, and even though it came as a huge shock to him, he’s also thankful and excited to know his son wasn’t killed in that attack long ago.”
“But, how are you feeling about all of this?” she asked again.
“I don’t know. It’s a lot to take in all at once."
"I used to think of Lawrence’s father sort of as my own father as well, and never really wondered what my real father would have been like.”
“And what do you think of Dominic?” she asked as they started getting ready for bed.
​“I like him.” Baron responded. “I've gotten to know him better since he moved in with my Mother, and he really is a good man. He seems to be a very impressive person, and I have great respect for him.” 
 “I really like him too,” added Naomi, “and I personally think this is amazing news. Who knew that your Father was still alive, and living right here with us in Miho’s castle? But I think your relationship will take some time to grow.”
“Yes,” replied Baron. “He suggested we just take it slow, and I should just continue to call him Dominic until some day when I might feel comfortable enough to call him Father.”

Sticky Toffee Pudding

Dec. 1st, 2025 12:00 pm
[syndicated profile] spoonforkbacon_feed

Posted by Jenny Park

Sticky toffee pudding spooned onto a plate and drizzled with sauce.

English Sticky Toffee Pudding is one of my top 3 favorite desserts of all time. I don’t think it gets enough love in the states and I wish that would change! I love it so much and this recipe is SO GOOD. It’s fluffy, moist and rich; plus the toffee sauce just takes it over the top. The lightly sweetened whipped cream adds a nice balance to the decadent pudding.

Our sticky toffee pudding recipe is a family-style version that feeds so it’s perfect for the holidays, if you’re trying to feed a group of people. It’s so cozy and satisfying!

What is Sticky Toffee Pudding?

Sticky toffee pudding is a moist English cake made with dates and covered in rich toffee sauce. It’s also traditionally served with vanilla custard or ice cream. We serve ours with lightly sweetened whipped cream.

What Does Sticky Toffee Pudding Taste Like?

Sticky toffee pudding has a decadent, soft and almost chewy caramel/toffee flavor and texture.

Although many sticky toffee pudding recipes don’t call for a spice mixture, we include a small amount of cinnamon, clove and nutmeg into ours which adds a subtle depth of flavor that compliments the sweet richness.

How to Make Our Sticky Toffee Pudding Recipe

Ingredients

Toffee Sauce Ingredients

Sticky toffee pudding sauce ingredients on a kitchen counter.

Pudding Ingredients

Sticky Toffee pudding ingredients all laid out on a kitchen counter.

Whipped Cream Ingredients

Sweet cream ingredients all laid out on a kitchen counter.

Process

Toffee Sauce Process

  1. Place all ingredients into saucepan. Stir together.
  2. Simmer until an amber sauce has formed and is thick enough to coat the back of a wooden spoon. Stir and remove from heat.
Making the sauce for sticky toffee pudding.
A pot full of sticky toffee pudding sauce.

Pudding Process

  1. Preheat oven to 350°F. Place dates and water in a saucepan and bring to a boil. Remove from heat and cool.
  2. Pour mixture into a blender and blend until smooth. Set aside.
Dates in a pot boiling to make sticky toffee pudding.
Dates pureed in a blender for sticky toffee pudding.
  1. In a mixing bowl combine flour, baking powder, baking soda, cinnamon, clove, nutmeg, and salt. Whisk together. Set aside.
  2. In bowl of a stand mixer with a paddle attachment (or using a hand mixer), cream together the unsalted butter and brown sugar.
Whisking together dry ingredients for sticky toffee pudding.
Butter and sugar creamed together for sticky toffee pudding.
  1. Add eggs and continue to beat together.
  2. Pour date puree and vanilla extract into butter mixture and beat until just incorporated.
Eggs, cream, and sugar in a bowl for sticky toffee pudding.
Dates and batter in a bowl for sticky toffee pudding.
  1. Add dry ingredients into wet ingredients and mix until fully combined.
  2. Lightly grease a (2 quart) baking dish with butter.
Eggs, cream, and sugar in a bowl for sticky toffee pudding.
A greased baking dish for sticky toffee pudding.
  1. Pour cake batter into prepared baking dish.
  2. Bake for about 30 to 35 minutes.Remove pudding from oven.
Sticky toffee pudding in a baking dish before it's baked.
Freshly baked cake for sticky toffee pudding.
  1. Carefully prick the entire surface with a fork.
  2. Pour half the toffee sauce evenly over the top of pudding and allow sauce to slightly soak in.
Poking sticky toffee pudding with a fork.
Pour toffee sauce over sticky toffee pudding.
  1. Place the sticky toffee pudding back into the oven for 5 minutes, until the toffee sauce begins to bubble. Remove from oven and slightly cool.
Sticky toffee pudding in a baking dish with sauce over it.

Whipped Cream Process

  1. Combine heavy cream, sugar and vanilla extract into a small bowl.
  2. Whisk together until a soft peaks form.
Making whipped cream for sticky toffee pudding.
Whipped cream in a glass bowl with a whisk for sticky toffee pudding.

Assembly

  1. Scoop some pudding into a shallow bowl and top with a dollop of whipped cream. Finish with a drizzle of toffee sauce and serve.
Sticky Toffee pudding on a plate with whipped cream and a fork.

Make Ahead and Freezing Sticky Toffee Pudding

Although this sticky toffee pudding is best enjoyed the day it’s made, it can be made ahead of time as well as frozen!

Make Ahead

  • Toffee sauce can be made up to 2 weeks ahead of time and stored in an airtight container in the refrigerator. To reheat, pour sauce into saucepan and simmer over low heat just until heated through.
  • Pudding can be made up to 3 days ahead of time. Cool completely from oven and tightly wrap with plastic wrap and store in the refrigerator. To reheat, uncover and heat in an oven until just warmed. Prick surface with fork and top with half the warmed toffee sauce. Place pudding back into oven for 10 minutes. Serve.
  • Whipped Cream should not be made ahead of time and should be used the day it is made.

Freezing

  • Toffee sauce can be frozen for up to 3 months. Store sauce in an airtight container in the freezer. To reheat, thaw sauce in the refrigerator overnight. Once thawed, pour sauce into a small saucepan and gently simmer until heated through.
  • Pudding can be frozen for up to 3 months. Cool pudding completely from oven and tightly wrap with plastic wrap and store in the freezer. To reheat, thaw in the refrigerator overnight. Once thawed, uncover and heat in an oven until just warmed. Prick surface with fork and top with half the warmed toffee sauce. Place pudding back into oven for 10 minutes. Serve.
Sticky toffee pudding recipe plated with a fork.

Variations

  • The cinnamon, clove and nutmeg spices can be adjusted to preferred taste or even omitted all together and still result in a delicious, sweet pudding.
  • Add a subtle chocolatey flavor by incorporating a small amount of unsweetened cocoa powder to the batter.
  • Fold a few tablespoons of the toffee sauce into the whipped cream for a toffee flavored whipped cream!
  • Serve the sticky toffee pudding with vanilla ice cream instead of whipped cream, to make it a la mode!
  • Make individual portions of our recipe by pouring the batter into small ramekins (about 6 ounces in size). Just decrease the baking time by about 8-10 minutes.
Sticky Toffee pudding recipe in two plates with a fork.

More Crowd Pleasing Dessert Recipes You Will Love

Sticky toffee pudding spooned onto a plate and drizzled with sauce.
Print

Sticky Toffee Pudding

The only Sticky Toffee Pudding recipe you'll ever want to make and eat! Soft, fluffy and moist sponge cake doused in a decadent toffee sauce and finished with dollops of whipped cream and even more toffee sauce.
Course Dessert
Cuisine English
Prep Time 10 minutes
Cook Time 50 minutes
Total Time 1 hour
Servings 12
Calories 683kcal

Ingredients

  • 1/2 cup (1 stick) unsalted butter, softened
  • 24 dates, pitted and chopped (5 ounces)
  • 1 1/2 cups water
  • 1 1/2 cups dark brown sugar
  • 1 1/2 teaspoons vanilla extract
  • 2 eggs
  • 1 3/4 cups all purpose flour
  • 2 teaspoons baking powder
  • 1/2 teaspoon baking soda
  • 1 teaspoon cinnamon
  • 1/4 teaspoon ground cloves
  • 1/4 teaspoon ground nutmeg
  • ¼ teaspoon salt

toffee sauce

  • 3/4 cup unsalted butter, softened
  • 1 1/2 cups dark brown sugar
  • 1 1/2 cups heavy cream
  • 1 1/2 teaspoons vanilla extract

sweet cream

  • 1 1/2 cups heavy cream
  • 1/2 cup sugar
  • 1/2 teaspoon vanilla extract

Instructions

toffee sauce

  • Place all toffee sauce ingredients into a saucepan and gently stir together. Simmer over medium heat until an amber sauce has formed and is thick enough to coat the back of a wooden spoon, about 10 minutes. Stir and remove from heat.

pudding

  • Preheat oven to 350°F.
  • Place dates and water in a small pot and bring to a boil. Remove from heat and set aside. Cool for 15 minutes.
  • Pour mixture into a blender and blend until smooth. Set aside.
  • In a mixing bowl combine flour, baking powder, baking soda, cinnamon, clove, nutmeg, and salt and whisk together. Set aside.
  • In bowl of a stand mixer with a paddle attachment (or using a hand mixer), cream together the butter and sugar.
  • Scrape down sides of the bowl and add egg, one at a time, continue to beat together.
  • Add date puree and vanilla into butter mixture and beat together until just incorporated.
  • Add dry ingredients into wet ingredients and mix until fully combined.
  • Pour mixture into a lightly greased (2 quart) baking dish and bake for about 30 to 35 minutes or until a toothpick comes out clean when inserted into the center of the pudding.
  • Remove pudding from oven and carefully prick the entire surface with a fork.
  • Pour half the toffee sauce evenly over the top of pudding and allow sauce to slightly soak in.
  • Place the sticky toffee pudding back into the oven for 5 minutes, until the toffee sauce begins to bubble. Remove from oven and slightly cool.

whipped cream

  • Place all the ingredients into a small bowl and whisk together until a soft peaks form.

assemble

  • Scoop some pudding into a shallow bowl and top with a dollop of whipped cream. Finish with a drizzle of toffee sauce and serve.

Video

Notes

**Although this sticky toffee pudding is best enjoyed the day it’s made, it can be made ahead of time as well as frozen**
Make Ahead
  • Toffee sauce can be made up to 2 weeks ahead of time and stored in an airtight container in the refrigerator. To reheat, pour sauce into saucepan and simmer over low heat just until heated through.
  • Pudding can be made up to 3 days ahead of time. Cool completely from oven and tightly wrap with plastic wrap and store in the refrigerator. To reheat, uncover and heat in an oven until just warmed. Prick surface with fork and top with half the warmed toffee sauce. Place pudding back into oven for 10 minutes. Serve.
  • Whipped Cream should not be made ahead of time and should be used the day it is made.
Freezing
  • Toffee sauce can be frozen for up to 3 months. Store sauce in an airtight container in the freezer. To reheat, thaw sauce in the refrigerator overnight. Once thawed, pour sauce into a small saucepan and gently simmer until heated through.
  • Pudding can be frozen for up to 3 months. Cool pudding completely from oven and tightly wrap with plastic wrap and store in the freezer. To reheat, thaw in the refrigerator overnight. Once thawed, uncover and heat in an oven until just warmed. Prick surface with fork and top with half the warmed toffee sauce. Place pudding back into oven for 10 minutes. Serve.

Nutrition

Calories: 683kcal | Carbohydrates: 84g | Protein: 5g | Fat: 38g | Saturated Fat: 24g | Cholesterol: 149mg | Sodium: 264mg | Potassium: 227mg | Fiber: 2g | Sugar: 66g | Vitamin A: 1387IU | Vitamin C: 1mg | Calcium: 135mg | Iron: 2mg

The post Sticky Toffee Pudding appeared first on Spoon Fork Bacon.

Sticky Toffee Pudding

Dec. 1st, 2025 12:00 pm
[syndicated profile] spoonforkbacon_feed

Posted by Jenny Park

Sticky toffee pudding spooned onto a plate and drizzled with sauce.

English Sticky Toffee Pudding is one of my top 3 favorite desserts of all time. I don’t think it gets enough love in the states and I wish that would change! I love it so much and this recipe is SO GOOD. It’s fluffy, moist and rich; plus the toffee sauce just takes it over the top. The lightly sweetened whipped cream adds a nice balance to the decadent pudding.

Our sticky toffee pudding recipe is a family-style version that feeds so it’s perfect for the holidays, if you’re trying to feed a group of people. It’s so cozy and satisfying!

What is Sticky Toffee Pudding?

Sticky toffee pudding is a moist English cake made with dates and covered in rich toffee sauce. It’s also traditionally served with vanilla custard or ice cream. We serve ours with lightly sweetened whipped cream.

What Does Sticky Toffee Pudding Taste Like?

Sticky toffee pudding has a decadent, soft and almost chewy caramel/toffee flavor and texture.

Although many sticky toffee pudding recipes don’t call for a spice mixture, we include a small amount of cinnamon, clove and nutmeg into ours which adds a subtle depth of flavor that compliments the sweet richness.

How to Make Our Sticky Toffee Pudding Recipe

Ingredients

Toffee Sauce Ingredients

Sticky toffee pudding sauce ingredients on a kitchen counter.

Pudding Ingredients

Sticky Toffee pudding ingredients all laid out on a kitchen counter.

Whipped Cream Ingredients

Sweet cream ingredients all laid out on a kitchen counter.

Process

Toffee Sauce Process

  1. Place all ingredients into saucepan. Stir together.
  2. Simmer until an amber sauce has formed and is thick enough to coat the back of a wooden spoon. Stir and remove from heat.
Making the sauce for sticky toffee pudding.
A pot full of sticky toffee pudding sauce.

Pudding Process

  1. Preheat oven to 350°F. Place dates and water in a saucepan and bring to a boil. Remove from heat and cool.
  2. Pour mixture into a blender and blend until smooth. Set aside.
Dates in a pot boiling to make sticky toffee pudding.
Dates pureed in a blender for sticky toffee pudding.
  1. In a mixing bowl combine flour, baking powder, baking soda, cinnamon, clove, nutmeg, and salt. Whisk together. Set aside.
  2. In bowl of a stand mixer with a paddle attachment (or using a hand mixer), cream together the unsalted butter and brown sugar.
Whisking together dry ingredients for sticky toffee pudding.
Butter and sugar creamed together for sticky toffee pudding.
  1. Add eggs and continue to beat together.
  2. Pour date puree and vanilla extract into butter mixture and beat until just incorporated.
Eggs, cream, and sugar in a bowl for sticky toffee pudding.
Dates and batter in a bowl for sticky toffee pudding.
  1. Add dry ingredients into wet ingredients and mix until fully combined.
  2. Lightly grease a (2 quart) baking dish with butter.
Eggs, cream, and sugar in a bowl for sticky toffee pudding.
A greased baking dish for sticky toffee pudding.
  1. Pour cake batter into prepared baking dish.
  2. Bake for about 30 to 35 minutes.Remove pudding from oven.
Sticky toffee pudding in a baking dish before it's baked.
Freshly baked cake for sticky toffee pudding.
  1. Carefully prick the entire surface with a fork.
  2. Pour half the toffee sauce evenly over the top of pudding and allow sauce to slightly soak in.
Poking sticky toffee pudding with a fork.
Pour toffee sauce over sticky toffee pudding.
  1. Place the sticky toffee pudding back into the oven for 5 minutes, until the toffee sauce begins to bubble. Remove from oven and slightly cool.
Sticky toffee pudding in a baking dish with sauce over it.

Whipped Cream Process

  1. Combine heavy cream, sugar and vanilla extract into a small bowl.
  2. Whisk together until a soft peaks form.
Making whipped cream for sticky toffee pudding.
Whipped cream in a glass bowl with a whisk for sticky toffee pudding.

Assembly

  1. Scoop some pudding into a shallow bowl and top with a dollop of whipped cream. Finish with a drizzle of toffee sauce and serve.
Sticky Toffee pudding on a plate with whipped cream and a fork.

Make Ahead and Freezing Sticky Toffee Pudding

Although this sticky toffee pudding is best enjoyed the day it’s made, it can be made ahead of time as well as frozen!

Make Ahead

  • Toffee sauce can be made up to 2 weeks ahead of time and stored in an airtight container in the refrigerator. To reheat, pour sauce into saucepan and simmer over low heat just until heated through.
  • Pudding can be made up to 3 days ahead of time. Cool completely from oven and tightly wrap with plastic wrap and store in the refrigerator. To reheat, uncover and heat in an oven until just warmed. Prick surface with fork and top with half the warmed toffee sauce. Place pudding back into oven for 10 minutes. Serve.
  • Whipped Cream should not be made ahead of time and should be used the day it is made.

Freezing

  • Toffee sauce can be frozen for up to 3 months. Store sauce in an airtight container in the freezer. To reheat, thaw sauce in the refrigerator overnight. Once thawed, pour sauce into a small saucepan and gently simmer until heated through.
  • Pudding can be frozen for up to 3 months. Cool pudding completely from oven and tightly wrap with plastic wrap and store in the freezer. To reheat, thaw in the refrigerator overnight. Once thawed, uncover and heat in an oven until just warmed. Prick surface with fork and top with half the warmed toffee sauce. Place pudding back into oven for 10 minutes. Serve.
Sticky toffee pudding recipe plated with a fork.

Variations

  • The cinnamon, clove and nutmeg spices can be adjusted to preferred taste or even omitted all together and still result in a delicious, sweet pudding.
  • Add a subtle chocolatey flavor by incorporating a small amount of unsweetened cocoa powder to the batter.
  • Fold a few tablespoons of the toffee sauce into the whipped cream for a toffee flavored whipped cream!
  • Serve the sticky toffee pudding with vanilla ice cream instead of whipped cream, to make it a la mode!
  • Make individual portions of our recipe by pouring the batter into small ramekins (about 6 ounces in size). Just decrease the baking time by about 8-10 minutes.
Sticky Toffee pudding recipe in two plates with a fork.

More Crowd Pleasing Dessert Recipes You Will Love

Sticky toffee pudding spooned onto a plate and drizzled with sauce.
Print

Sticky Toffee Pudding

The only Sticky Toffee Pudding recipe you'll ever want to make and eat! Soft, fluffy and moist sponge cake doused in a decadent toffee sauce and finished with dollops of whipped cream and even more toffee sauce.
Course Dessert
Cuisine English
Prep Time 10 minutes
Cook Time 50 minutes
Total Time 1 hour
Servings 12
Calories 683kcal

Ingredients

  • 1/2 cup (1 stick) unsalted butter, softened
  • 24 dates, pitted and chopped (5 ounces)
  • 1 1/2 cups water
  • 1 1/2 cups dark brown sugar
  • 1 1/2 teaspoons vanilla extract
  • 2 eggs
  • 1 3/4 cups all purpose flour
  • 2 teaspoons baking powder
  • 1/2 teaspoon baking soda
  • 1 teaspoon cinnamon
  • 1/4 teaspoon ground cloves
  • 1/4 teaspoon ground nutmeg
  • ¼ teaspoon salt

toffee sauce

  • 3/4 cup unsalted butter, softened
  • 1 1/2 cups dark brown sugar
  • 1 1/2 cups heavy cream
  • 1 1/2 teaspoons vanilla extract

sweet cream

  • 1 1/2 cups heavy cream
  • 1/2 cup sugar
  • 1/2 teaspoon vanilla extract

Instructions

toffee sauce

  • Place all toffee sauce ingredients into a saucepan and gently stir together. Simmer over medium heat until an amber sauce has formed and is thick enough to coat the back of a wooden spoon, about 10 minutes. Stir and remove from heat.

pudding

  • Preheat oven to 350°F.
  • Place dates and water in a small pot and bring to a boil. Remove from heat and set aside. Cool for 15 minutes.
  • Pour mixture into a blender and blend until smooth. Set aside.
  • In a mixing bowl combine flour, baking powder, baking soda, cinnamon, clove, nutmeg, and salt and whisk together. Set aside.
  • In bowl of a stand mixer with a paddle attachment (or using a hand mixer), cream together the butter and sugar.
  • Scrape down sides of the bowl and add egg, one at a time, continue to beat together.
  • Add date puree and vanilla into butter mixture and beat together until just incorporated.
  • Add dry ingredients into wet ingredients and mix until fully combined.
  • Pour mixture into a lightly greased (2 quart) baking dish and bake for about 30 to 35 minutes or until a toothpick comes out clean when inserted into the center of the pudding.
  • Remove pudding from oven and carefully prick the entire surface with a fork.
  • Pour half the toffee sauce evenly over the top of pudding and allow sauce to slightly soak in.
  • Place the sticky toffee pudding back into the oven for 5 minutes, until the toffee sauce begins to bubble. Remove from oven and slightly cool.

whipped cream

  • Place all the ingredients into a small bowl and whisk together until a soft peaks form.

assemble

  • Scoop some pudding into a shallow bowl and top with a dollop of whipped cream. Finish with a drizzle of toffee sauce and serve.

Video

Notes

**Although this sticky toffee pudding is best enjoyed the day it’s made, it can be made ahead of time as well as frozen**
Make Ahead
  • Toffee sauce can be made up to 2 weeks ahead of time and stored in an airtight container in the refrigerator. To reheat, pour sauce into saucepan and simmer over low heat just until heated through.
  • Pudding can be made up to 3 days ahead of time. Cool completely from oven and tightly wrap with plastic wrap and store in the refrigerator. To reheat, uncover and heat in an oven until just warmed. Prick surface with fork and top with half the warmed toffee sauce. Place pudding back into oven for 10 minutes. Serve.
  • Whipped Cream should not be made ahead of time and should be used the day it is made.
Freezing
  • Toffee sauce can be frozen for up to 3 months. Store sauce in an airtight container in the freezer. To reheat, thaw sauce in the refrigerator overnight. Once thawed, pour sauce into a small saucepan and gently simmer until heated through.
  • Pudding can be frozen for up to 3 months. Cool pudding completely from oven and tightly wrap with plastic wrap and store in the freezer. To reheat, thaw in the refrigerator overnight. Once thawed, uncover and heat in an oven until just warmed. Prick surface with fork and top with half the warmed toffee sauce. Place pudding back into oven for 10 minutes. Serve.

Nutrition

Calories: 683kcal | Carbohydrates: 84g | Protein: 5g | Fat: 38g | Saturated Fat: 24g | Cholesterol: 149mg | Sodium: 264mg | Potassium: 227mg | Fiber: 2g | Sugar: 66g | Vitamin A: 1387IU | Vitamin C: 1mg | Calcium: 135mg | Iron: 2mg

The post Sticky Toffee Pudding appeared first on Spoon Fork Bacon.

Penric audio news

Nov. 30th, 2025 08:29 am
[syndicated profile] lois_mcmaster_bujold_feed
Some preliminary dates have surfaced for the release of "Testimony of Mute Things" by Blackstone Audiobooks.

General release is scheduled for February 14, 2026:

https://www.downpour.com/products/boo...

And at all the usual suspects/online vendors. Happy Valentine's?

In addition, Audible has an earlier release on December 16th.

https://www.amazon.com/Testimony-Mute...

I've no idea why Audible gets a 2-month exclusive head start; business matters I expect. It was the same for "Demonic Ox".

At any rate, "Coming Soon!" is roughly true.

Ta, L.

posted by Lois McMaster Bujold on November, 30

Kale and Sausage Rigatoni

Nov. 30th, 2025 12:00 pm
[syndicated profile] spoonforkbacon_feed

Posted by Teri Lyn Fisher

Close up on a bowl of kale and sausage rigatoni in a bowl with a fork.

This Kale and Sausage Rigatoni Recipe brings together all the things we love about Italian comfort food, with its rich, creamy sauce, savory sausage, and hearty greens. The only thing we love more than the flavor is that you’ll spend less than 30 minutes preparing it, making it perfect for a busy weeknight.

While you could use other noodles for this pasta dish, rigatoni has a special spot in our food-loving hearts. Just like with our Spicy Rigatoni Recipe and Rigatoni with Romesco Sauce, the pasta makes all the difference. The thick, tubular shape catches all the creamy, cheesy tomato sauce, so every bite is a little explosion of comfort and flavor.

How to Make Our Kale and Sausage Rigatoni Recipe

Ingredients

Ingredients to make a kale and sausage rigatoni recipe all laid out.

Process

  1. Place a large pot, filled with water, over high heat and bring to a boil. Add a small handful of salt followed by the pasta. Bring to a boil and stir. Boil pasta for 7 to 8 minutes or until al dente. Drain pasta into a colander. Set aside.
  2. Place a large skillet over medium heat and add 1 1/2 tablespoons oil. Once hot, add sausage. Using a wooden spoon, break sausage apart until evenly crumbled and browned.
A colander filled with cooked rigatoni.
A skilled with a wood spoon cooking Italian sausage.
  1. Transfer sausage to a plate and return skillet to stove.
  2. Add remaining oil. Once hot, add shallot and fennel (if using) and sauté for 2 to 3 minutes. Season with salt and pepper.
A bowl of cooked Italian sausage on the side of a skillet.
A skillet cooking some chopped fennel with a wooden spoon.

  1. Stir in garlic and continue to sauté for 30 seconds.
  2. Add tomato paste and stir for 1 minute.

A skillet that has fennel and garlic in it cooking to make a pasta recipe.
Tomato paste with some chopped vegetables in a skillet cooking.
  1. Deglaze the skillet with the wine or stock, scraping up the bits on the bottom with a wooden spoon. Continue to cook until the liquid has mostly evaporated.
  2. Stir in cream and reduce heat to medium-low. Season with salt and pepper and stir. Simmer sauce until reduced by half, 3 to 4 minutes.
The base of a red sauce pasta cooking in a skillet.
A red sauce pasta sauce simmering in a skillet with a wooden spoon.
  1. Gently stir in Parmesan until fully incorporated and sauce is smooth and creamy.
  2. Stir sausage back into skillet, along with kale and pepper flakes and simmer for 3 to 4 minutes.
A red sauce pasta with parmesan being added to the skillet.
Rigatoni pasta tossed with sausage and kale and a red sauce in a skillet.
  1. Add pasta to skillet and gently stir into sauce. Season with salt and pepper and serve with more grated Parmesan and crushed red pepper flakes.
Red pepper flakes sprinkled on a rigatoni pasta dish in a skillet.

Why We Love This Rigatoni Recipe

  • It’s quick and easy: This whole dish comes together in under 30 minutes, and once you’ve boiled your pasta, the rest takes just one skillet, making clean up just as quick and easy.
  • It’s incredibly adaptable: While this recipe is tested and approved with the ingredients we’ve used, you can easily swap out several options to make it your own. Make it spicy with a spicy Italian sausage, or even vegetarian by swapping the sausage for a plant-based meat or white beans. Regular kale and even spinach can be used in place of the Tuscan kale, and if you don’t like or can’t find fennel, swap it for bell peppers, leeks, or a diced onion.
  • It’s a complete meal in one: With pasta, protein, and veggies made in just one dish, you don’t have to stress about what sides you’ll serve it with (although we do have several at the bottom just in case!).
A bowl of kale and sausage rigatoni with a fork on the side.

Prepping Our Rigatoni Recipe Ahead of Time

Sure, this recipe comes together in less than 30 minutes, but we all know that some nights, even 30 minutes isn’t fast enough. Here are some ways to make this dinner come together even faster.

  • Prep the veggies ahead of time: Dice the shallot, fennel, and garlic up to a few days beforehand and store in the refrigerator. And since the fennel and shallot are getting tossed in together, go ahead and store them together!
  • Prepare the pasta ahead: Making the pasta the night before can help make this a real one-dish meal. Just prepare the pasta until Al dente, stir in a drizzle of olive oil, cool, and store in the refrigerator for 1-2 days. Make sure to save a small dish of pasta water to add to the sauce!
  • Brown and crumble the sausage: Cook and crumble the Italian sausage up to two days ahead of time and store it in the refrigerator. While doing this step ahead will result in a small reduction in flavor (deglazing the browned bits adds a good amount of complexity), it will save several minutes on the night of.

Or, to meal prep the entire dish, but still feel like you’re eating a freshly cooked meal:

  • Make this recipe up to step 9. Stir in the sausage, but then let the dish cool. Cover or place in an airtight container in the refrigerator for up to 24 hours.
  • Place the contents back into a pan and on the stove. Slowly reheat over low, stirring so everything warms evenly. Add a splash more chicken broth if needed. Then proceed with the recipe, adding the kale, parmesan, and pasta.
Kale and sausage rigatoni pasta in a bowl with wine on the side.

Storing and Reheating Leftovers

With a little extra liquid added, this rigatoni is just as good the next day, making it a good option for meal prep or enjoying leftovers.

  • To store leftovers: Transfer any leftover rigatoni to an airtight container and refrigerate for up to 3-4 days. The pasta will continue to absorb the sauce as it sits, so the consistency will be a bit thicker when you reheat it, but you can easily thin it out by stirring in a bit more cream or chicken broth. Since this is a cream-based pasta, its texture may turn a bit curdled or gritty if frozen, so we don’t recommend this method of storage.
  • To reheat on the stovetop (our preferred method): Place the leftover pasta in a skillet over medium-low heat. Add a splash of cream, milk, or chicken broth (2-3 tablespoons at a time) to loosen the sauce and bring it back to a creamy consistency. Stir the pasta occasionally as it warms through, for about 5 to 7 minutes.
  • To reheat in the microwave: Transfer a portion to a microwave-safe bowl and add a tablespoon or two of cream or milk. Cover the bowl with a damp paper towel or microwave-safe cover, then microwave for 45-60 seconds at a time, stirring in between, until heated through.

What to Serve with Our Kale and Sausage Rigatoni

Whether you’re enjoying this dish for a quick weeknight meal or a weekend dinner, these easy sides are always a hit:

More Delicious Pasta Recipes You Will Love

A dinner scene with a bowl of kale and sausage rigatoni with wine in the background.
Close up on a bowl of kale and sausage rigatoni in a bowl with a fork.
Print

Kale and Sausage Rigatoni Recipe

Creamy, garlicky, and loaded with savory Italian sausage and tender kale, this decadent rigatoni recipe comes together in less than 30 minutes with minimal effort and maximum flavor.
Course dinner, Main Course
Cuisine Italian
Prep Time 10 minutes
Cook Time 15 minutes
Total Time 25 minutes
Servings 4
Calories 804kcal

Ingredients

  • 8 ounces dry rigatoni
  • 8 ounces mild Italian chicken sausage removed from casing
  • 3 tablespoons olive oil divided
  • 3 tablespoons minced shallot
  • 1 cup finely diced fennel bulb
  • 2 minced garlic cloves
  • 3 tablespoons tomato paste
  • 1/3 cup dry white wine (or chicken stock)
  • 1 1/2 cups heavy cream
  • 1 bunch torn (in small pieces) and massaged Tuscan kale ribs removed (about 3 heaping cups)
  • 1 1/2 ounces freshly grated Parmesan cheese plus more for sprinkling
  • 1 teaspoon crushed red pepper flakes (optional) plus more for sprinkling
  • salt and pepper to taste

Instructions

  • Place a large pot, filled with water, over high heat and bring to a boil. Add a small handful of salt followed by the pasta. Bring to a boil and stir. Boil pasta for 7 to 8 minutes or until al dente. Drain pasta into a colander. Set aside.
  • Place a large skillet over medium heat and add 1 1/2 tablespoons oil. Once hot, add sausage. Using a wooden spoon, break sausage apart until evenly crumbled and browned.
  • Transfer sausage to a plate and return skillet to stove.
  • Add remaining oil. Once hot, add shallot and fennel (if using) and sauté for 2 to 3 minutes. Season with salt and pepper.
  • Stir in garlic and continue to sauté for 30 seconds.
  • Add tomato paste and stir for 1 minute.
  • Deglaze the skillet with the wine or stock, scraping up the bits on the bottom with a wooden spoon. Continue to cook until the liquid has mostly evaporated.
  • Stir in cream and reduce heat to medium-low. Season with salt and pepper and stir. Simmer sauce until reduced by half, 3 to 4 minutes.
  • Stir sausage back into skillet, along with kale and pepper flakes and simmer for 3 to 4 minutes.
  • Gently stir in Parmesan until fully incorporated and sauce is smooth and creamy.
  • Add pasta to skillet and gently stir into sauce. Season with salt and pepper and serve with more grated Parmesan and crushed red pepper flakes.

Notes

Storing and Reheating Leftovers
  • To store leftovers: Transfer any leftover rigatoni to an airtight container and refrigerate for up to 3-4 days. The pasta will continue to absorb the sauce as it sits, so the consistency will be a bit thicker when you reheat it, but you can easily thin it out by stirring in a bit more cream or chicken broth. Since this is a cream-based pasta, its texture may turn a bit curdled or gritty if frozen, so we don’t recommend this method of storage.
  • To reheat on the stovetop (our preferred method): Place the leftover pasta in a skillet over medium-low heat. Add a splash of cream, milk, or chicken broth (2-3 tablespoons at a time) to loosen the sauce and bring it back to a creamy consistency. Stir the pasta occasionally as it warms through, for about 5 to 7 minutes.
  • To reheat in the microwave: Transfer a portion to a microwave-safe bowl and add a tablespoon or two of cream or milk. Cover the bowl with a damp paper towel or microwave-safe cover, then microwave for 45-60 seconds at a time, stirring in between, until heated through.

Nutrition

Calories: 804kcal | Carbohydrates: 57g | Protein: 25g | Fat: 52g | Saturated Fat: 26g | Polyunsaturated Fat: 4g | Monounsaturated Fat: 18g | Cholesterol: 138mg | Sodium: 1748mg | Potassium: 835mg | Fiber: 7g | Sugar: 10g | Vitamin A: 8581IU | Vitamin C: 87mg | Calcium: 405mg | Iron: 8mg

The post Kale and Sausage Rigatoni appeared first on Spoon Fork Bacon.

denise: Image: Me, facing away from camera, on top of the Castel Sant'Angelo in Rome (Default)
[staff profile] denise in [site community profile] dw_news
Hello, friends! It's about to be December again, and you know what that means: the fact I am posting this actually before December 1 means [staff profile] karzilla reminded me about the existence of linear time again. Wait, no -- well, yes, but also -- okay, look, let me back up and start again: it's almost December, and that means it's time for our annual December holiday points bonus.

The standard explanation: For the entire month of December, all orders made in the Shop of points and paid time, either for you or as a gift for a friend, will have 10% of your completed cart total sent to you in points when you finish the transaction. For instance, if you buy an order of 12 months of paid time for $35 (350 points), you'll get 35 points when the order is complete, to use on a future purchase.

The fine print and much more behind this cut! )

Thank you, in short, for being the best possible users any social media site could possibly ever hope for. I'm probably in danger of crossing the Sappiness Line if I haven't already, but you all make everything worth it.

On behalf of Mark, Jen, Robby, and our team of awesome volunteers, and to each and every one of you, whether you've been with us on this wild ride since the beginning or just signed up last week, I'm wishing you all a very happy set of end-of-year holidays, whichever ones you celebrate, and hoping for all of you that your 2026 is full of kindness, determination, empathy, and a hell of a lot more luck than we've all had lately. Let's go.

More About Lighting

Nov. 29th, 2025 12:34 pm
[syndicated profile] antiquelilac_feed

At the Beach

I like taking photos down by the lake, but it has to be either in the morning or on an overcast day. It's because I can't take photos facing east because there's a big nuclear plant at the far end of the beach, which would be totally inappropriate in the background of some 'Medieval' scene. So that means I have to shoot towards the west, but it has to be before noon or it would mean shooting into the sun, and then the dolls would just be dark silhouettes against a bright background. So, a bright overcast morning is always best, because then there's soft filtered light without any harsh shadows.

​Like in the scenes of Baron and Naomi's family holiday at the beach. I set up the scene, and then went to lay down on a tarp on the sand a few metres away, so I'd be down at the doll's eye level, and then I'd direct Jan to make any small adjustments if needed...
Then I'd zoom in to take the photos....

Iris' New Dress

I wanted to take series of photos of Iris making herself a new dress for her baby's first birthday, so set up the Victorian interior on the dining room table....
When taking photos with the dining room table pushed into the bay window, the light is brightest close to the window, and the scene will often need some extra light further in the 'room' away from the window. I'll often use a photography light, but the easiest, way to add the most natural light is to position the foil-covered board to bounce light from the window back onto the subject.
Then there's soft natural light coming from both directions without any harsh shadows. But again, the photos need to be taken before noon on a sunny day, before the sun starts to come in the window, like in these two photos, where it was already shining on the train of the dress, making it a bit over-exposed.

Lighting

Nov. 28th, 2025 11:37 am
[syndicated profile] antiquelilac_feed
One of the most important aspects of doll photography is the lighting. When I take photos outside my patio, I have to take the photos facing the south, which means the dolls are facing away from the light.  So I use an art board covered with aluminum foil to bounce the light from the open sky behind them onto the dolls. It's important not to have it too close otherwise it will reflect too bright a light onto them.
When taking photos inside, my favourite lighting is when I have the dining room table pushed into the bay window, which faces west. The best photos are taken on a sunny morning before the sun rises high enough in the sky to come through the window, but after the sun is high enough to hit the exterior south-facing wall of the kitchen, and bounce light into the dining room through the window. But my prop window unit is not that wide, so the light gets bounced not only through the window itself, but also behind it, adding more light to the subjects, which would otherwise be back-lit and mere silhouettes against the bright window..

Thanksgiving Sandwich

Nov. 28th, 2025 12:00 pm
[syndicated profile] spoonforkbacon_feed

Posted by Jenny Park

A leftover Thanksgiving sandwich with a moist maker.

I think a leftover Thanksgiving Sandwich is one of the best things about thanksgiving meal. It might sound silly, but I look forward to these sandwiches every black Friday. They’re so ridiculously indulgent and perfect.

We love this thanksgiving sandwich so much and think the extra gravy soaked bread really takes this sandwich over the top! We drew inspiration for this sandwich from one of our favorite show, Friends, where one of the characters, Monica, makes leftover thanksgiving sandwiches with a gravy soaked slice of bread, which she coined as the “moist maker”. It’s a very appropriate name too because it truly ensures your sandwich won’t be dry in any way, while also adding more flavor. Some of you might remember THIS scene from the episode, which is the best and never seems to get old!

Thanksgiving sandwich with a moist maker recipe.

Anyway, this is quite a hefty sandwich and we know the added carbs from both the third slice of bread AND the stuffing might be a little much for some. If that’s the case for you, I highly recommend still making this sandwich, but instead of adding an extra slice of bread, just dip each slice of turkey into the gravy. You still get the delicious flavor of the gravy in the sandwich, but can trim away at a little bit of the extra carbs.

Thanksgiving moist maker sandwich cut in half.

More Sandwich Recipes You Will Love

Thanksgiving sandwich recipe.
Print

Thanksgiving Sandwich

The best thanksgiving sandwich with a MOIST MAKER! That's right, our leftover thanksgiving turkey sandwich includes a slice of gravy soaked bread in the center. It takes the sandwich to the next level! Our sandwich is simple, but incredibly delicious and satisfying!
Course lunch, Main Course
Cuisine Amercian
Prep Time 10 minutes
Total Time 10 minutes
Servings 1
Calories 1030kcal

Ingredients

  • 3 slices bread
  • 2 tablespoons mayonnaise
  • 1/2 cup cranberry sauce
  • 6 ounces roasted turkey, thinly sliced
  • 1/2 cup stuffing
  • 2 green leaf lettuce leaves optional
  • 1/2 cup turkey gravy

Instructions

  • Spread a small amount of mayonnaise onto two slices of bread.
  • Dip the remaining slice of bread in gravy and set aside.
  • Build the sandwich however you like, placing the gravy soaked bread in the center.
  • Gently push together and enjoy!

Notes

**Makes 1 large Sandwich**

Nutrition

Calories: 1030kcal | Carbohydrates: 125g | Protein: 41g | Fat: 42g | Saturated Fat: 8g | Polyunsaturated Fat: 18g | Monounsaturated Fat: 11g | Trans Fat: 1g | Cholesterol: 99mg | Sodium: 1817mg | Potassium: 596mg | Fiber: 8g | Sugar: 63g | Vitamin A: 2607IU | Vitamin C: 6mg | Calcium: 179mg | Iron: 6mg

The post Thanksgiving Sandwich appeared first on Spoon Fork Bacon.

A Gala Evening

Nov. 26th, 2025 12:02 pm
[syndicated profile] antiquelilac_feed
Decided to take some photos with ladies wearing all four of the new ballgowns together.  However I only have two tuxedos, so only two of the ladies were accompanied by their partners....

Profile

tea_and_toast: (Default)
tea_and_toast
June 1 2 3 4 5 6 7 8 9 10 11 12 13 14 15 16 17 18 19 20 21 22 23 24 25 26 27 28 29 30 2017

Most Popular Tags

Powered by Dreamwidth Studios

Style Credit